QuickStart
To introduce you to the major features of the CGC, this QuickStart will walk through a simple RNA sequencing analysis.
Prerequisites
In order to be able to use all resources which are discussed in this QuickStart you need to have access to TCGA Controlled Data through dbGap. if you don’t have access to TCGA Controlled Data, you can still follow the QuickStart, but without the possibility to add Controlled Data to your project.
However, you can still analyze the Open Data from TCGA dataset using the available apps without special permission from dbGaP.
Procedure
We'll start by creating a project and populating it with TCGA files. Then we'll use one of the CGC RNA-Seq workflows, RNA-Seq Alignment - STAR, to carry out the analysis. Finally, we'll examine our results.
On this page:
Create a project
The first step to running an analysis on the CGC is to create a project.
- To create a project:
a. Choose Create a project under Projects in the top navigation bar and the window for naming your project will be shown.
b. Enter Quickstart as the project name.
c. Choose Pilot Funds as the billing group.
d. Select This project will contain TCGA Controlled Data since we’ll be using TCGA Controlled Data.
e. Click Create.
This concludes the procedure for creating a new project. The next step is adding analysis data.
Add analysis data
In this Quickstart, we will use the TCGA data that is hosted on the CGC to analyze Glioblastoma patient with TP53 missense mutation.
- To add analysis data:
a. The first step is selecting all cases that belong to the Glioblastoma disease (GBM). Choose Data Overview from the Data menu.
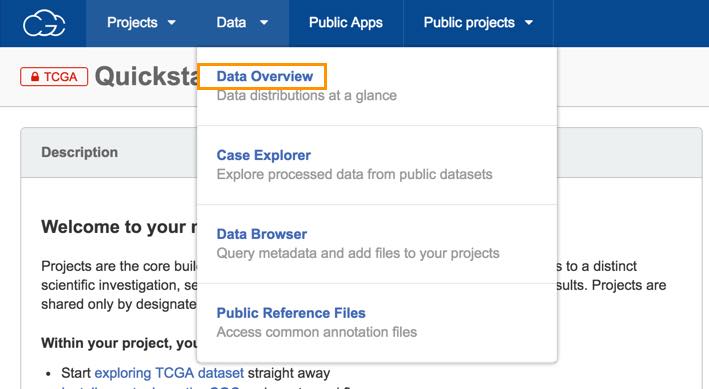
The Data Overview page will be displayed, as shown below.
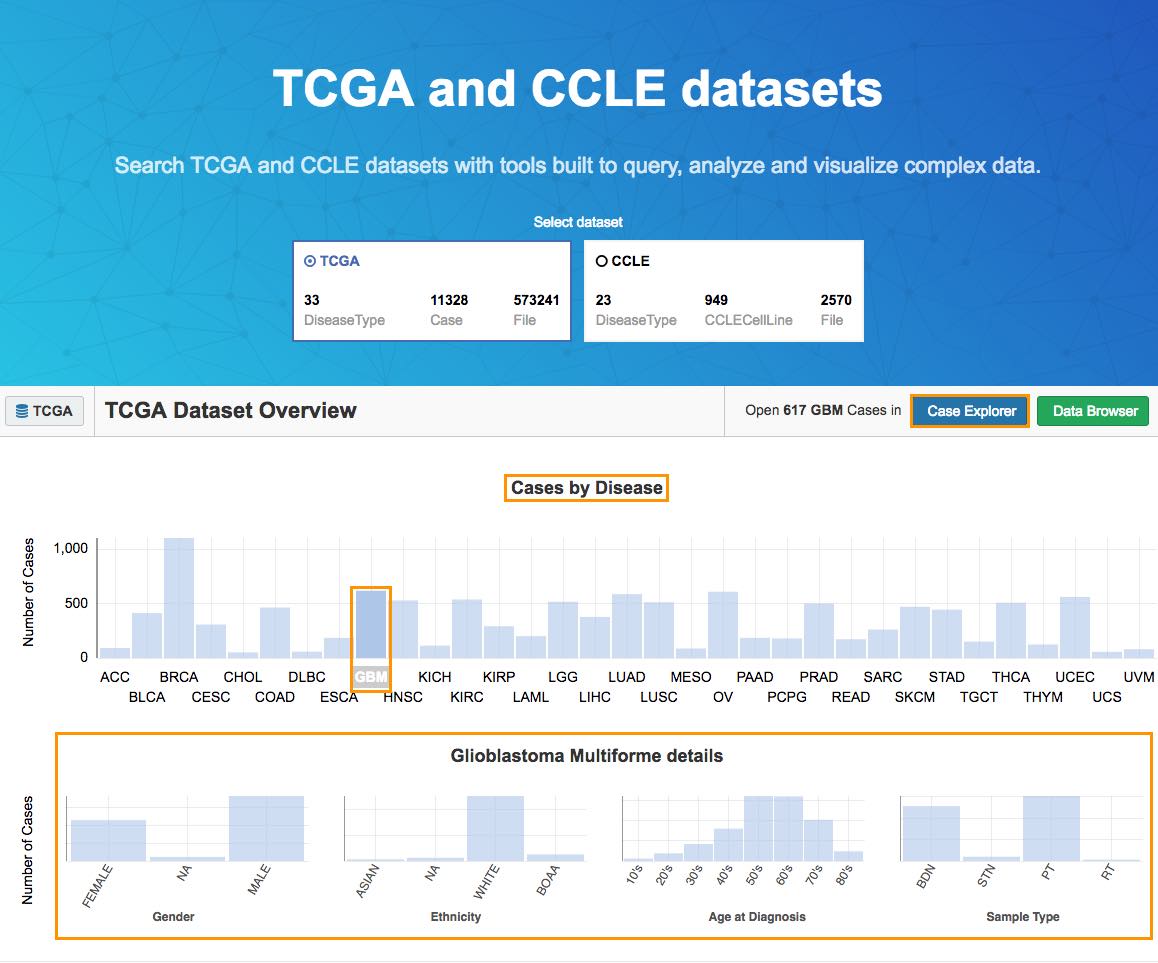
b. Select GBM from the Cases by Disease section.

The Disease Details section below will show:
- The total number of cases.
- The female/male distribution.
- Ethnicity.
- Age at diagnosis.
- The sample type.
Hover the bars to see the number of available cases for each of the categories. The next step is to filter these cases using the Case Explorer.
The Case Explorer is designed to allow researchers to easily find a subset of TCGA data based on a disease and gene mutation.
c. Click Case Explorer in the upper right corner (see above) to open the Case Explorer.
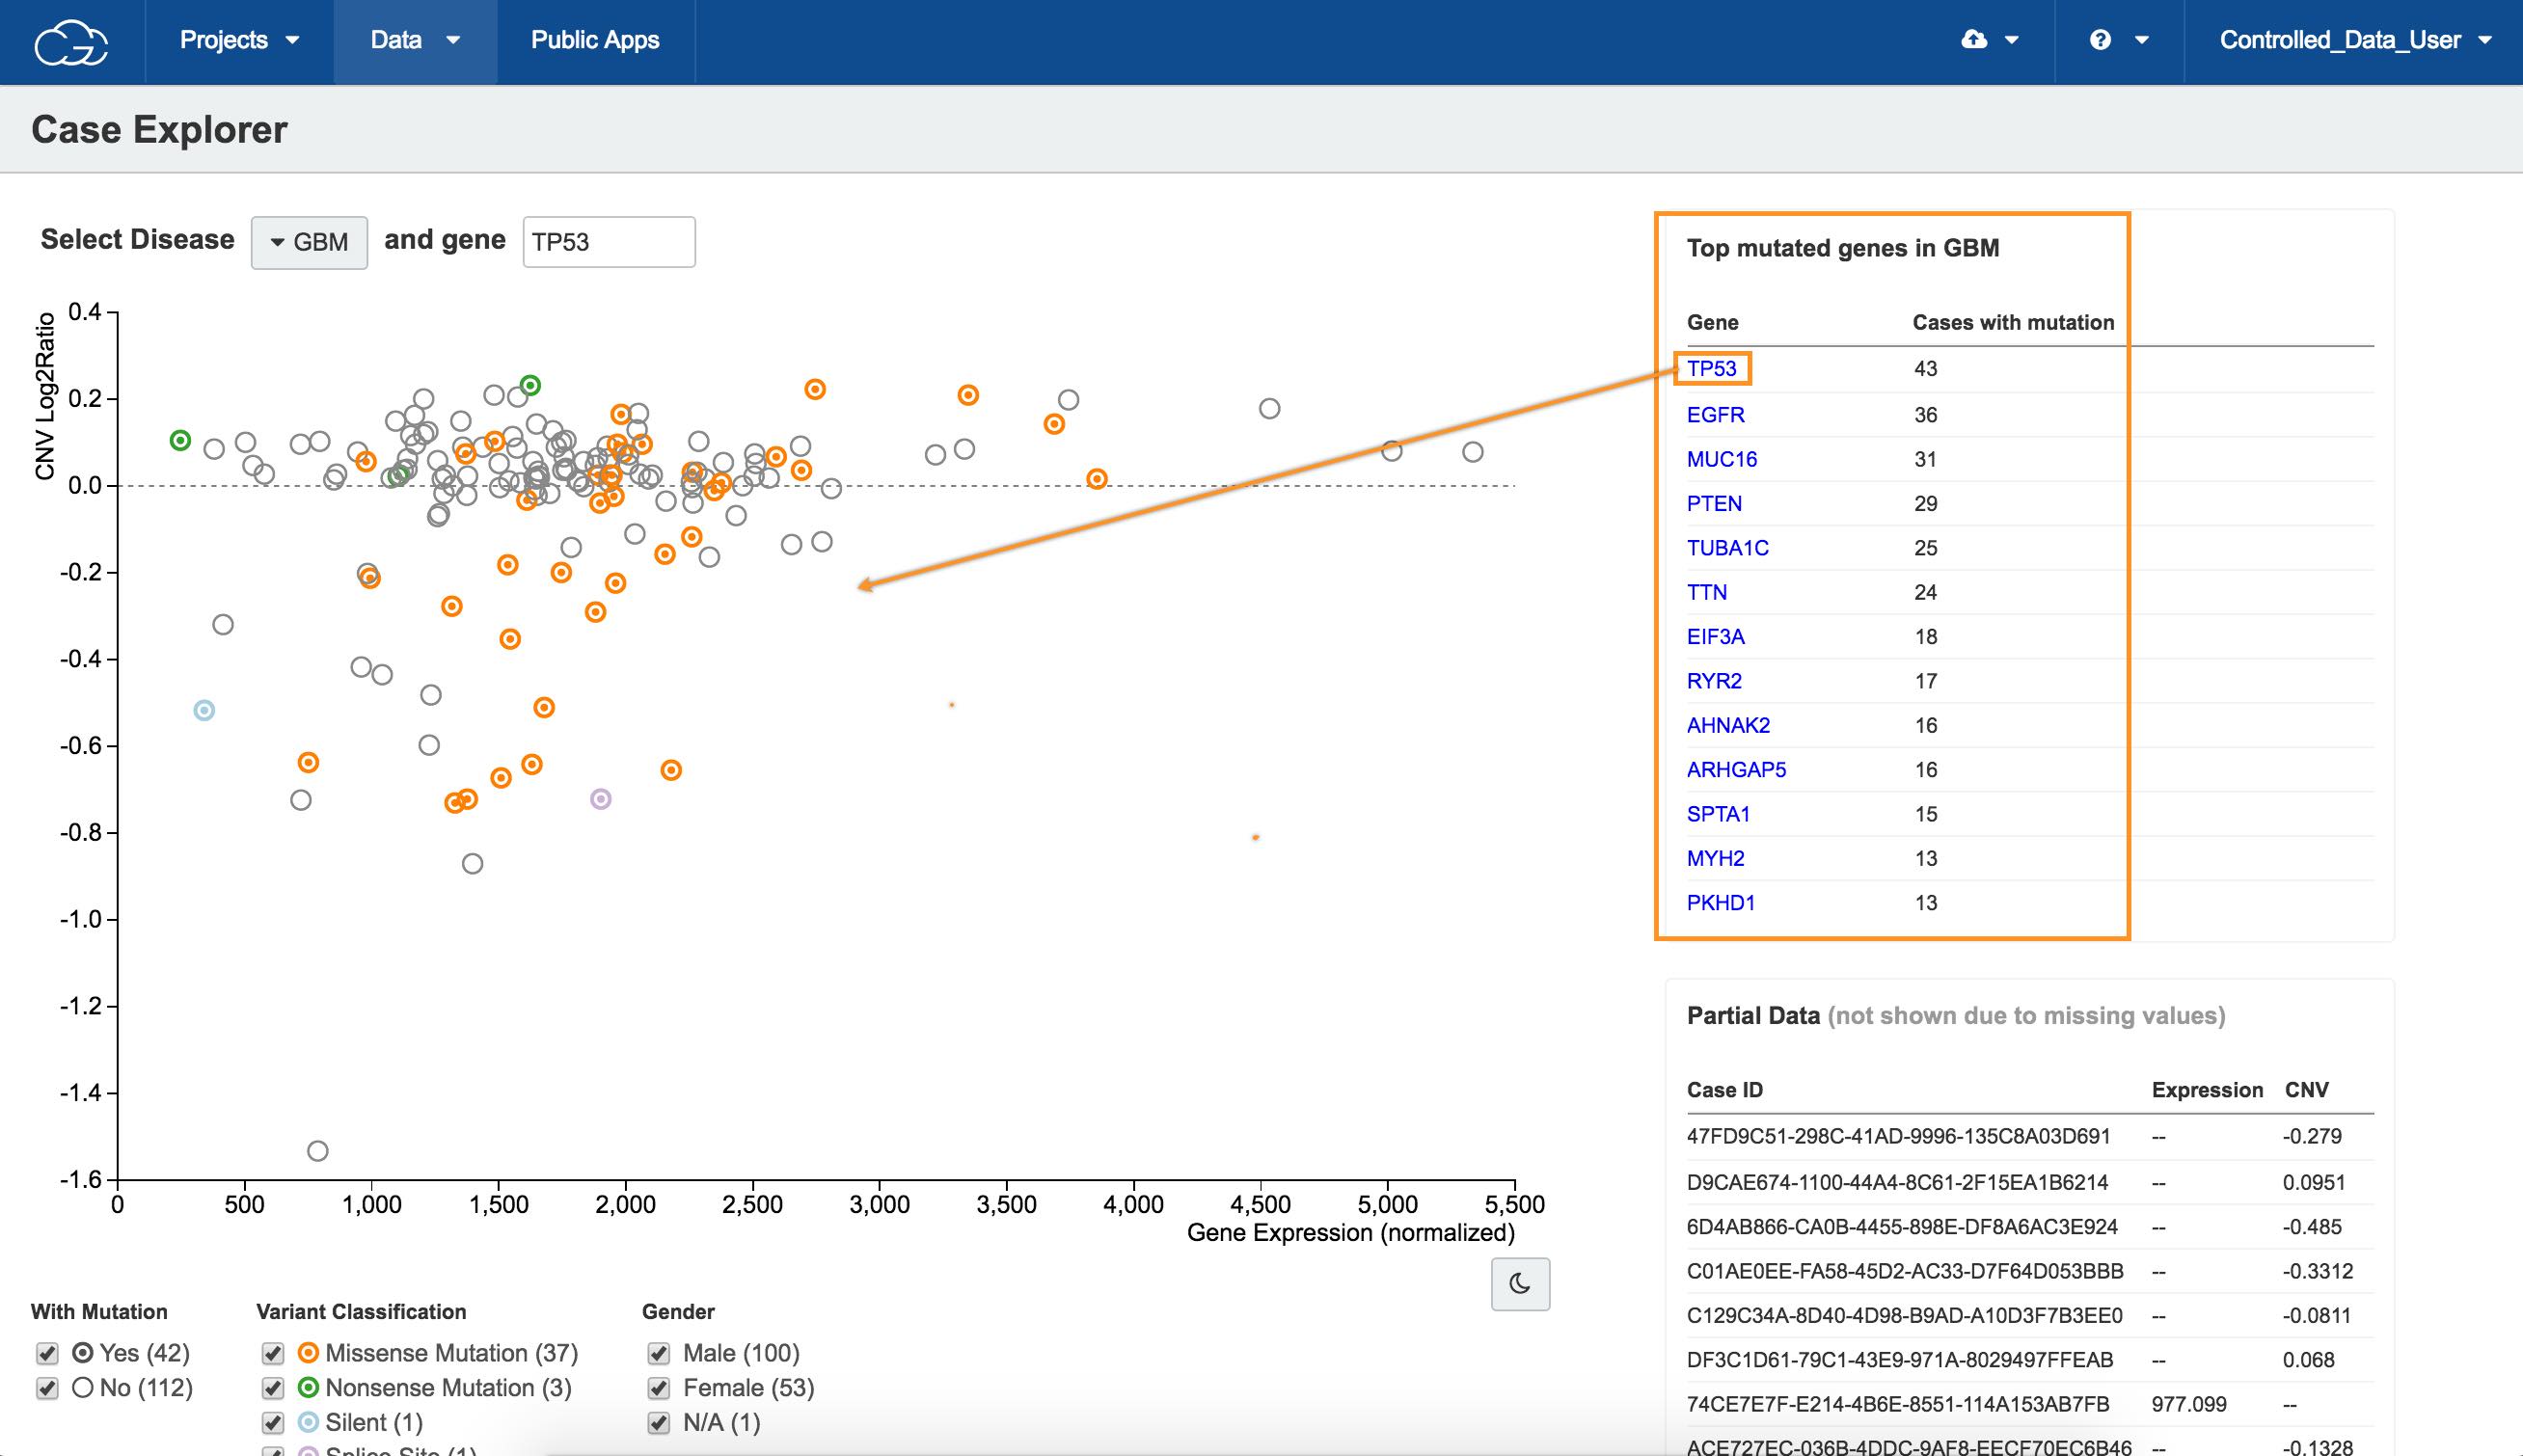
d.Click TP53 in the Top mutated genes in GBM table in the upper right corner, as shown above. All available cases will be displayed on the scatter plot.
Circle colors on the scatter plot
The scatter plot is populated to show the relation between copy number variation (CNV) on the y-axis and gene expression levels on the x-axis for the selected gene in patients with GBM.
The colors of the circles represent different types of mutation (see the Variant Classification filter below the scatter plot).
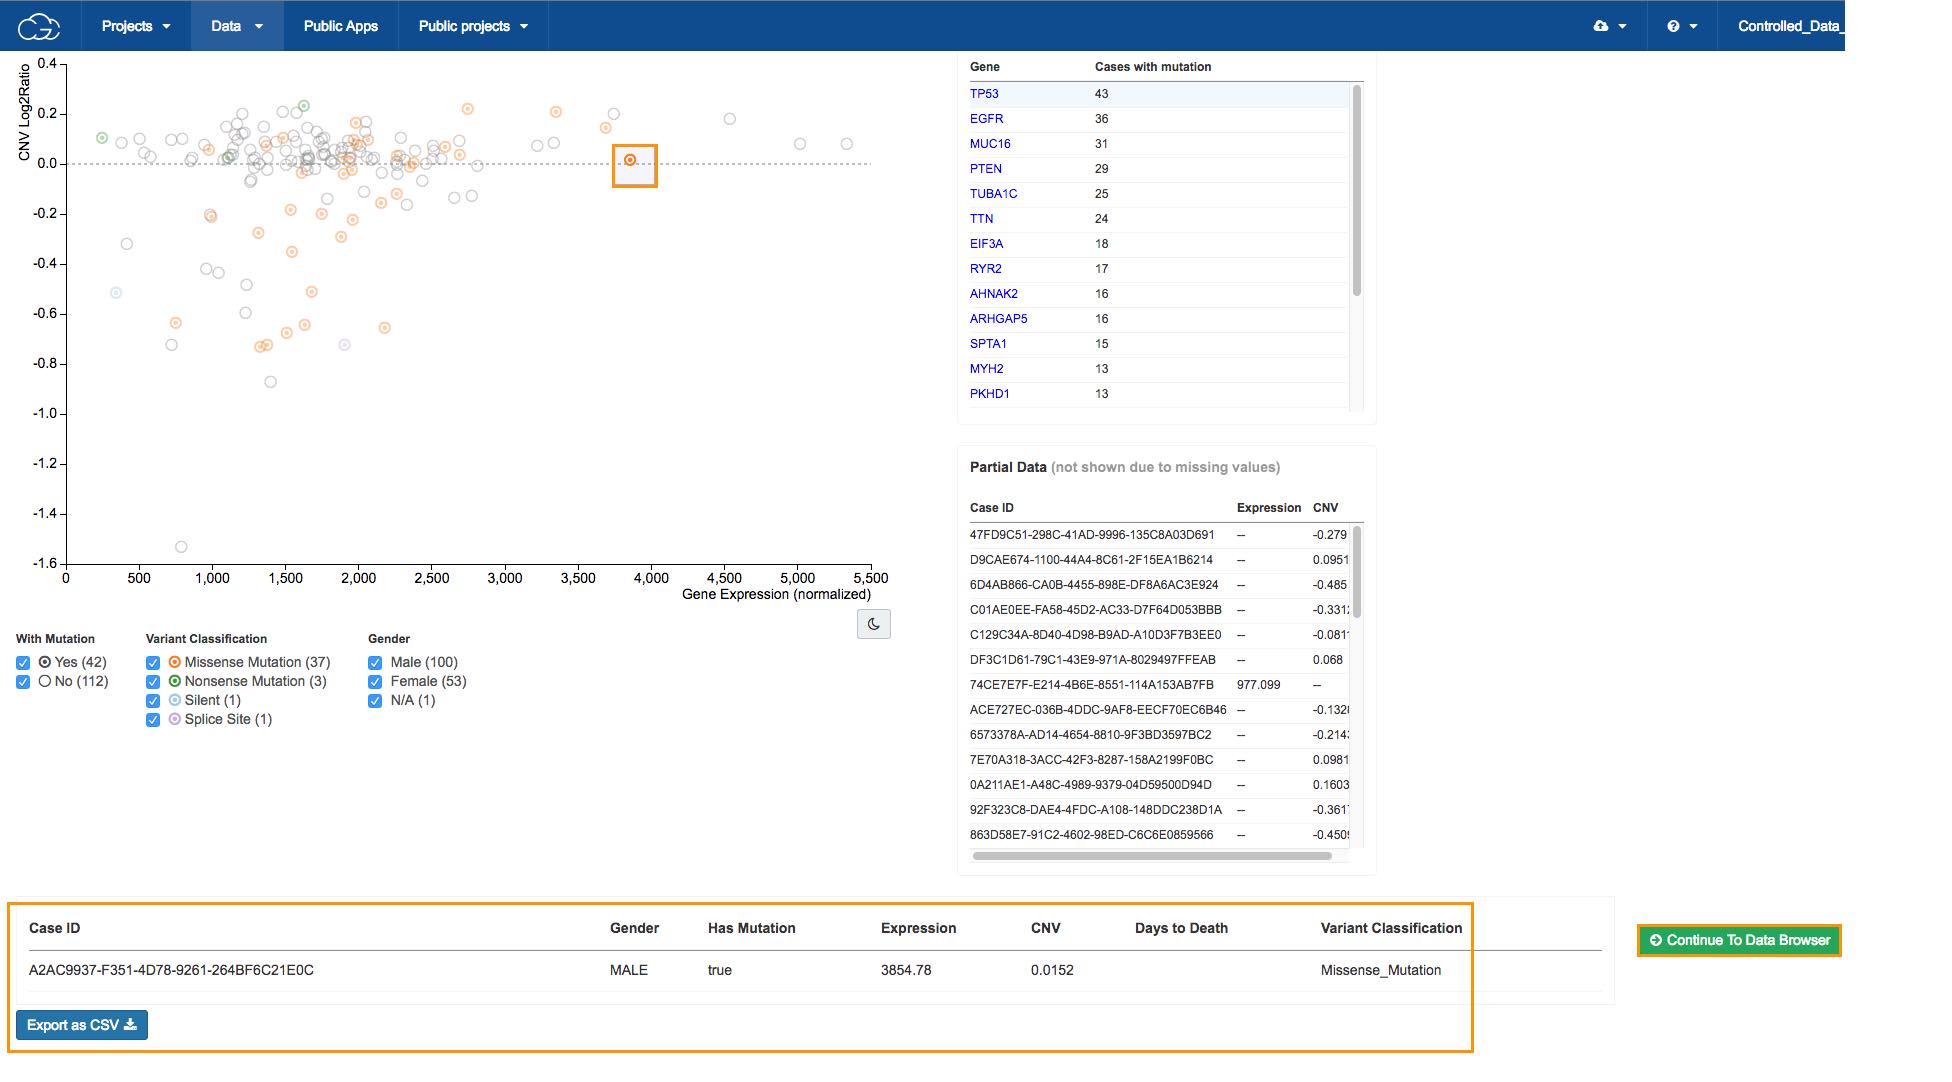
e. Select a case, as shown above. The case information will be displayed in the bottom of the page.
f. Click Continue to Data Browser to copy the file for the case we selected. This will take us to the Data Browser where we can find the RNA-Seq raw sequencing reads from this case.
Selecting multiple Cases
Copy multiple files at once by selecting them all before clicking the Continue to Data Browser button.
Find files associated with the case
Using the Data Browser, we'll build a query to filter data from this case by combining metadata attributes. In the example below, we will choose RNA-Seq as experimental strategy and TARGZ as data format, since RNA-Seq raw sequencing reads in TCGA data are compressed in TARGZ format. Upon opening it, the Data Browser will display the case we picked using the Case Explorer.
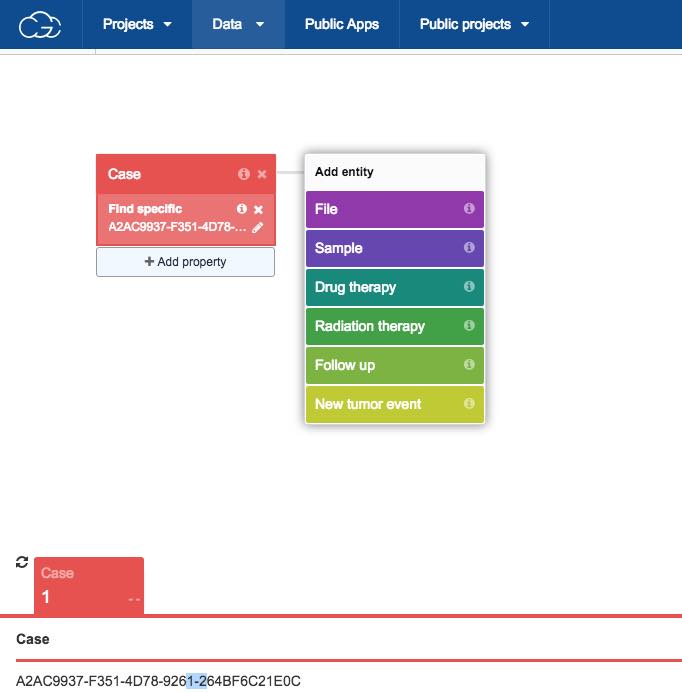
- To find RNA-Seq files associated with this case:
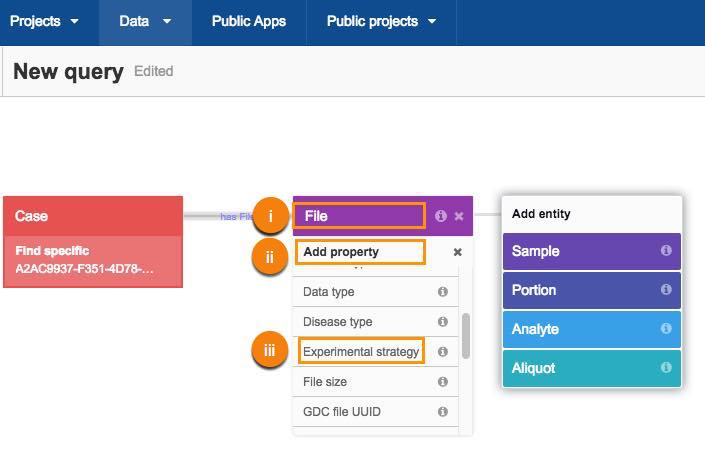
a. Choose the RNA-seq as experimental strategy:
i. Click File.
ii. Click Add property.
iii. Select Experimental strategy.
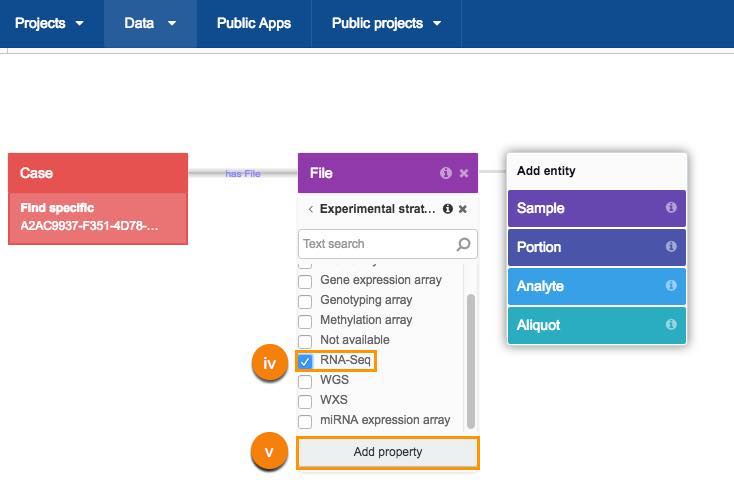
iv. Next, choose the RNA-Seq metadata filter.
v. Click Add property.
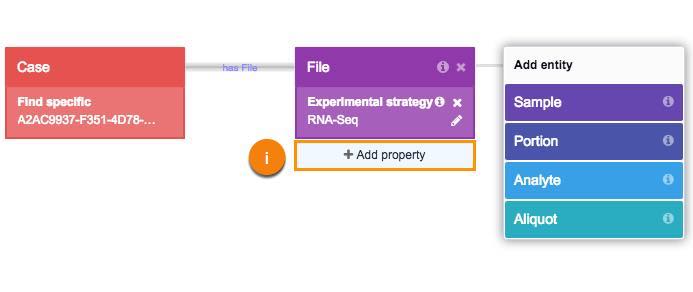
b. Repeat this procedure to add TARGZ data format as a property.
i. Click Add property.
ii. Click Data format.
iii. Choose TARGZ filter.
iv. Click Add property.
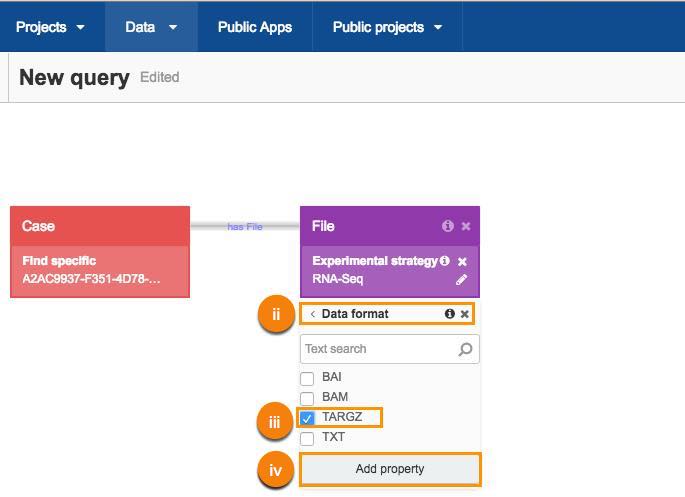
This will give you all the files created as a result of the RNA-Seq experiment.
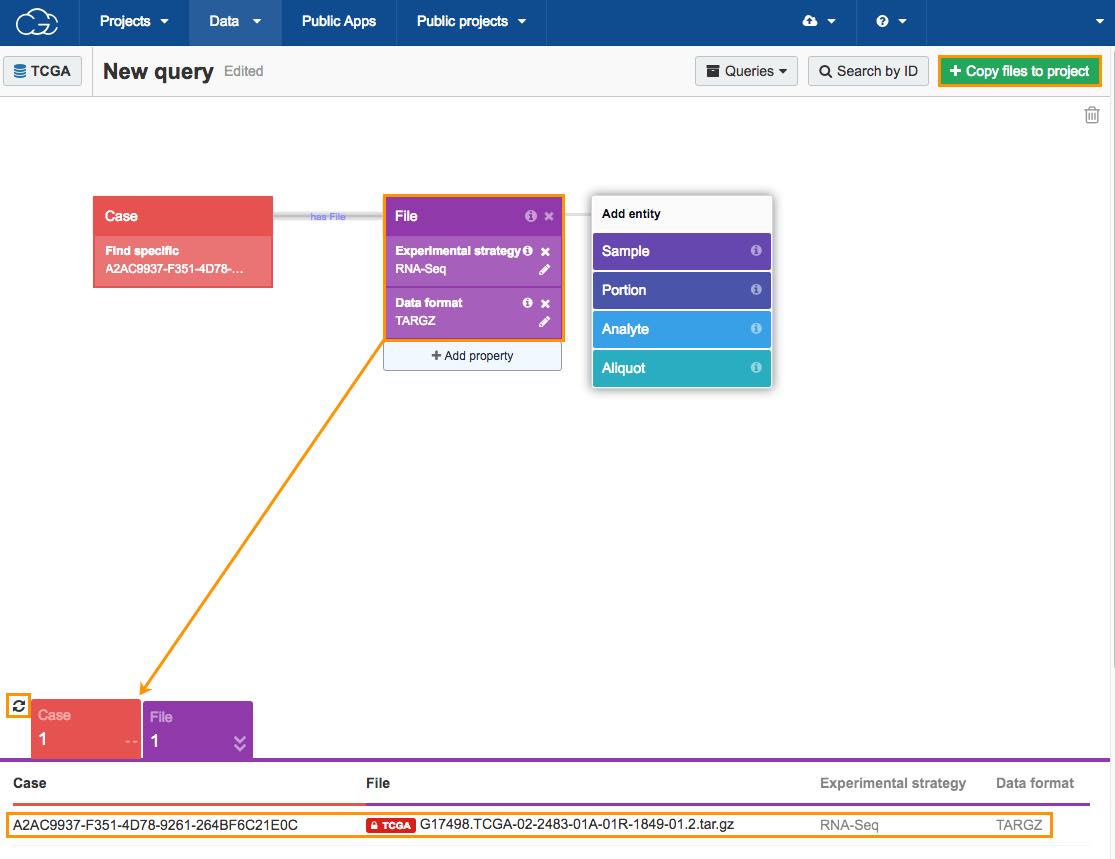
Click the refresh icon next to the count cards below the Data Browser to display the number of cases and results returned by the query, which is one case and one file. The next step is adding the TCGA file to your project.
Add the TCGA file to your project
- To add the TCGA file to your project after finding it using the Data Browser:
a. Click Copy files to project in the upper right corner.
b. Choose your Quickstart project.
The confirmation window will be shown.
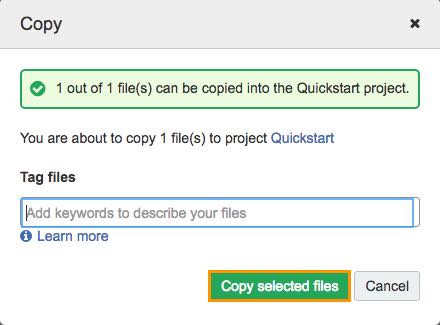
c. Click Copy selected files.
This concludes the procedure of adding the TCGA file to your project. The next step is choosing the workflow for your analysis.
Choose a public workflow
With the analysis data now prepared, we need to choose a workflow for performing the analysis. We'll use the public workflow RNA-seq Alignment - STAR for TCGA PE tar, which uses the popular split-read aligner, STAR, to map reads to a reference genome.
This workflow utilizes a transcript annotation file (GTF) to speed read mapping across known splice junctions. It will generate alignment files that can then be compared for differential expression, analyzed to discover novel transcripts, or viewed directly in the genome browser.
5. To select a public workflow:
a. Click Public Apps in the top bar navigation.
b. Search for the RNA-seq Alignment - STAR for TCGA PE tar.
c. Click Copy below the workflow.
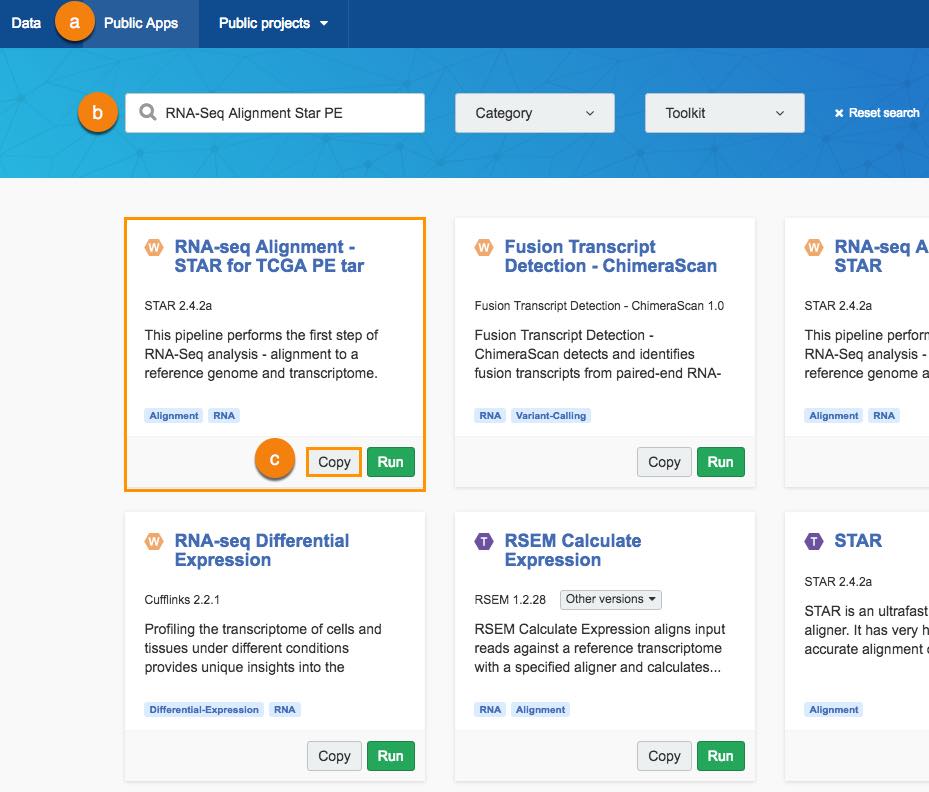
The window for selecting the target project will be displayed.
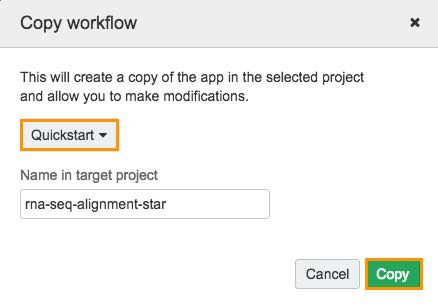
d. Choose your Quickstart project.
e. Click Copy.
This will copy the workflow to your project apps. The next step is running the analysis.
Run the analysis
Now that the analysis data and the workflow are ready, it's time to run the analysis.
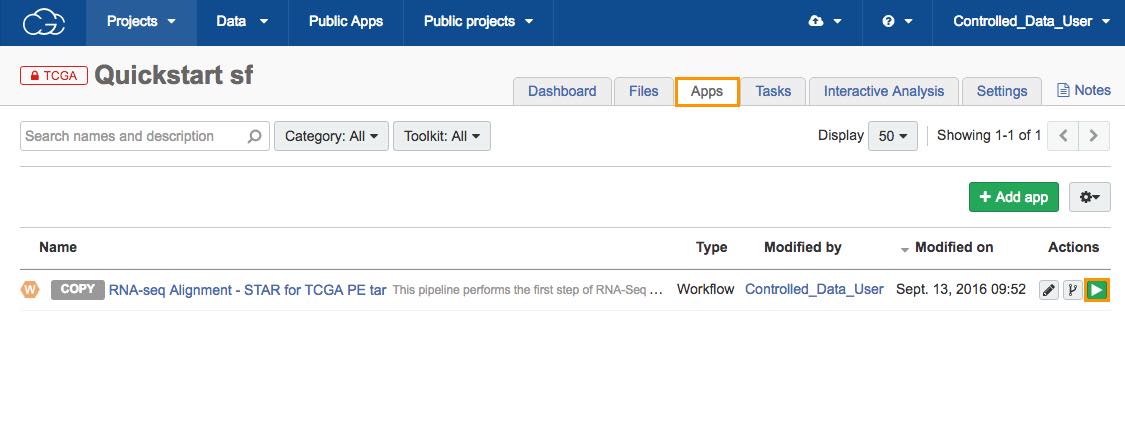
6. To run the analysis:
a. Click the Apps tab in your Quickstart project.
b. Click the run icon next to the RNA-seq Alignment - STAR for TCGA PE tar workflow.
This will open the draft task page and a pop-up window which contains the suggested reference files for this workflow.
For all public workflows on the CGC our team of bioinformaticians has chosen a set of recommended input files. This allows you to quickly add all required reference files.
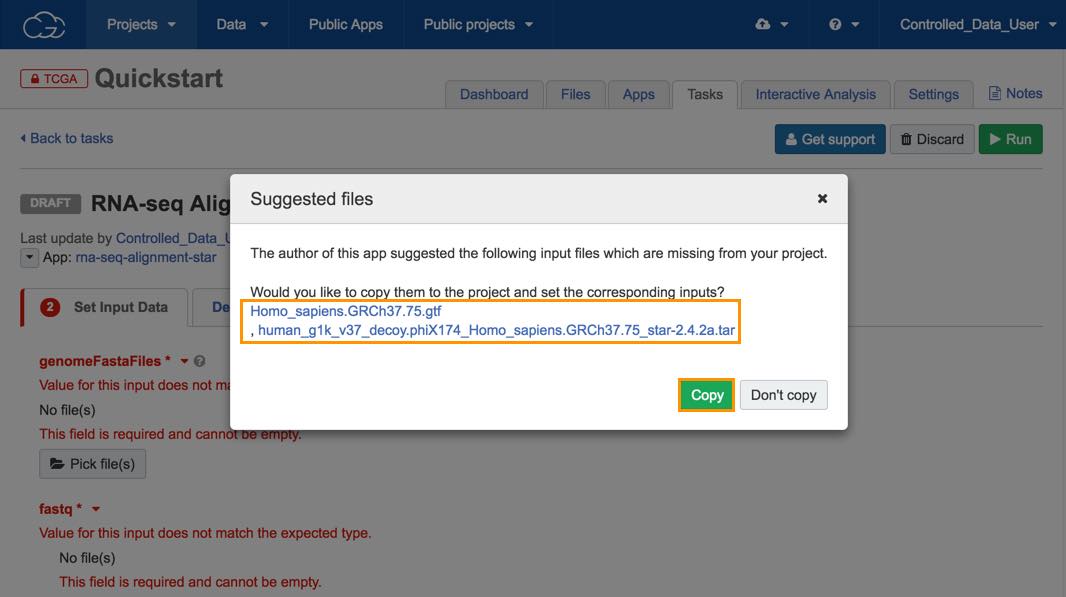
c. Click Copy and the suggested files will be copied to your project and added as input files to your workflow.
d. Next, click Pick file(s) under Input Read Files to locate the analysis data that we have previously added to the project using the Data Browser and Case Explorer.
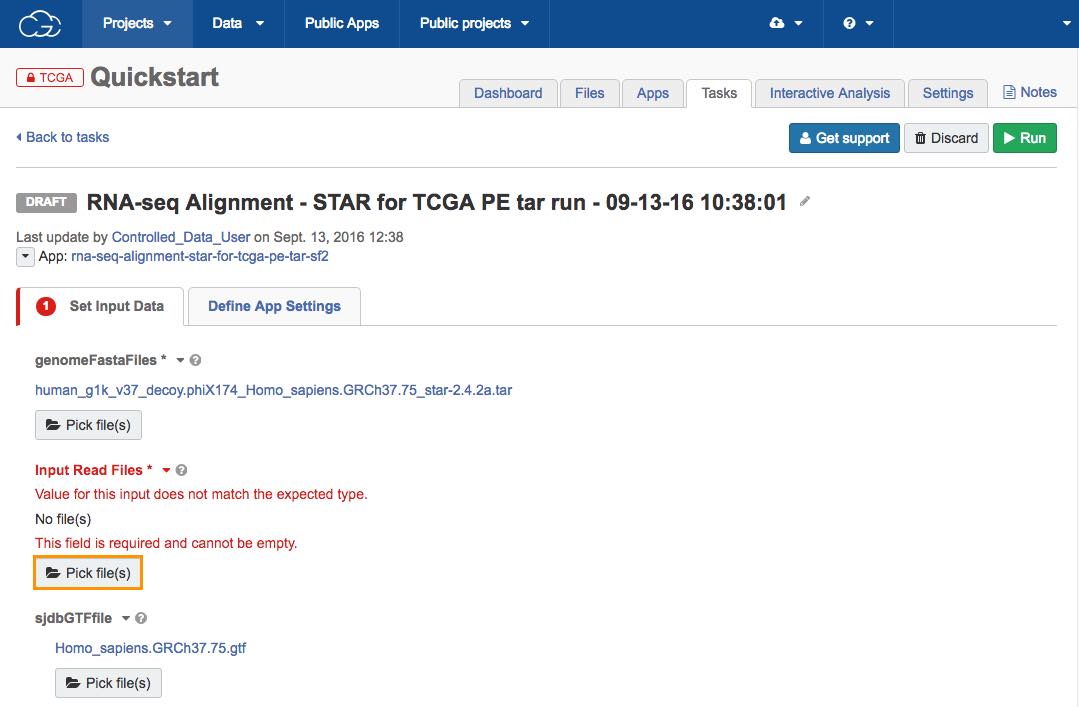
The file picker will be shown.
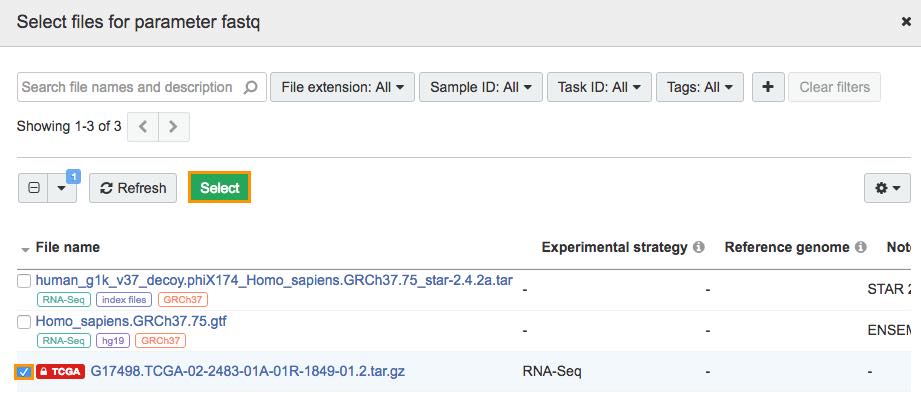
e. Select TCGAG17498.TCGA-02-2483-01A-01R-1849-01.2.tar.gz
f. Click Select and the analysis data will be added to the workflow.
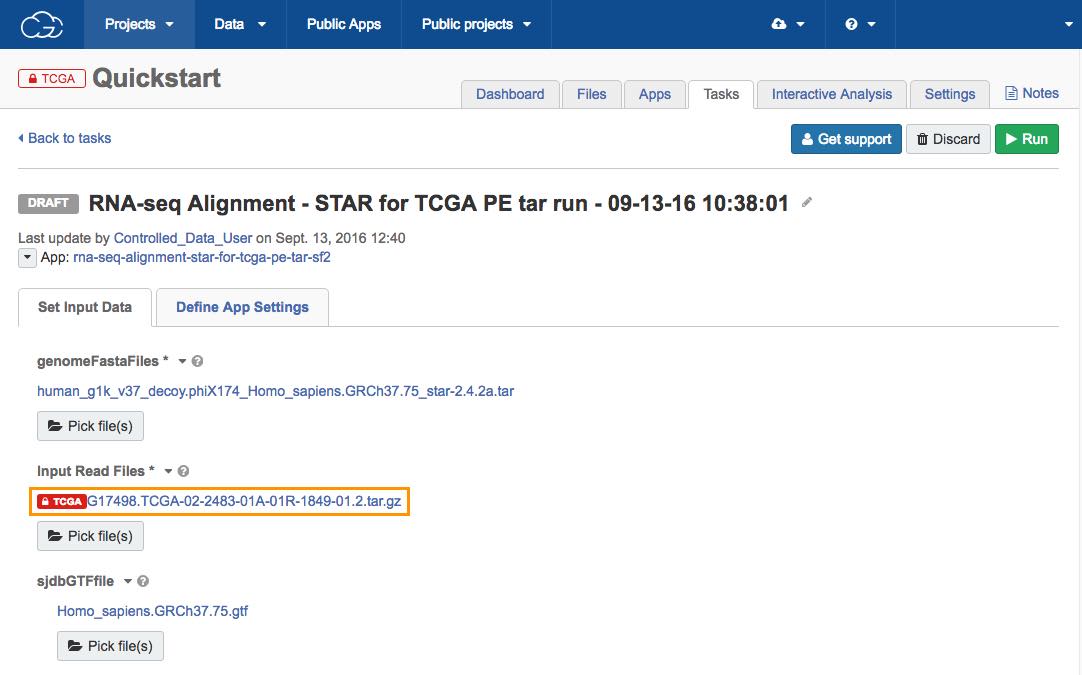
Now that all the required input files for the workflow are set, click Run to start the analysis.
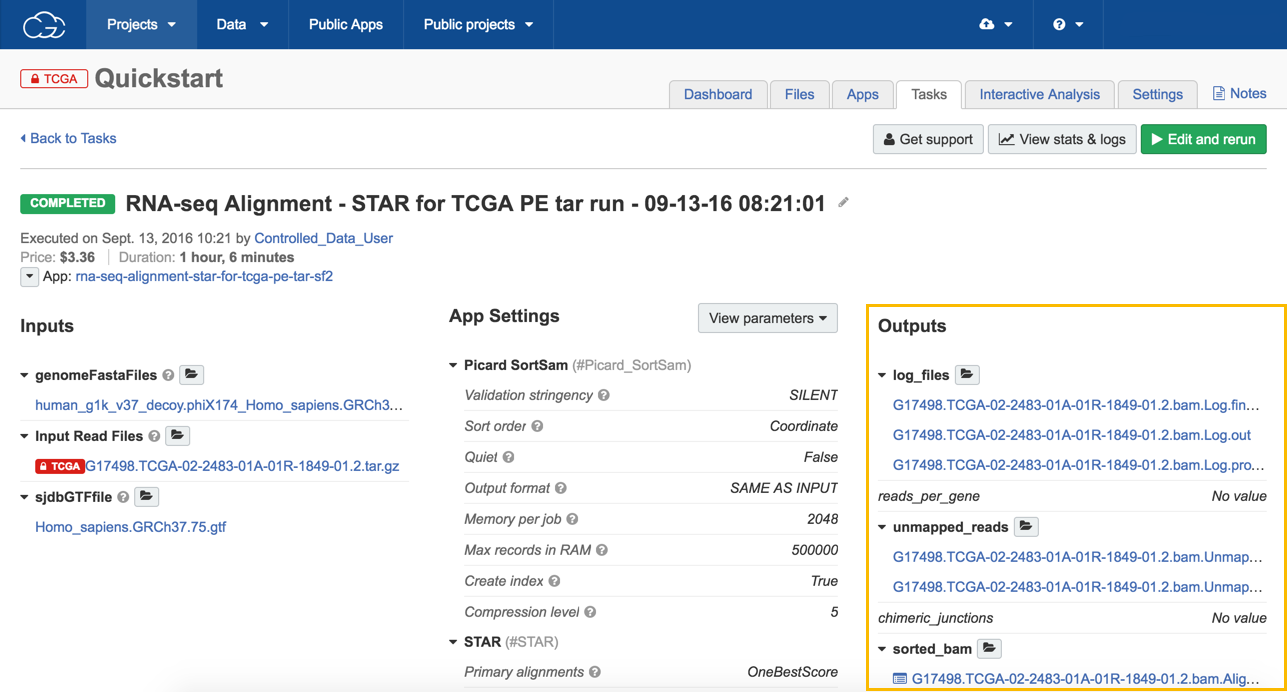
When you start the task, a new page opens displaying the task's properties. The status will be a progress bar (if the task is still running) or a label detailing whether the task has completed, been aborted or failed.
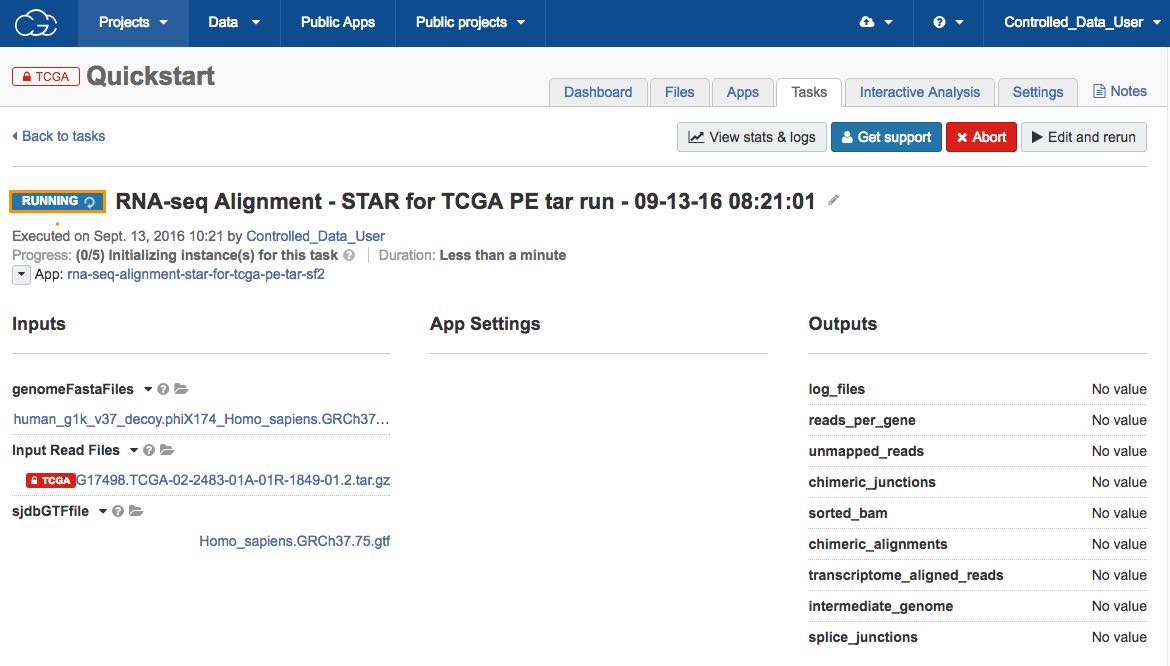
Additional information, including how to check the status of the task or how to troubleshoot in case of the failed task, is available in the documentation on task statistics.
View the results
- To see the results of your task:
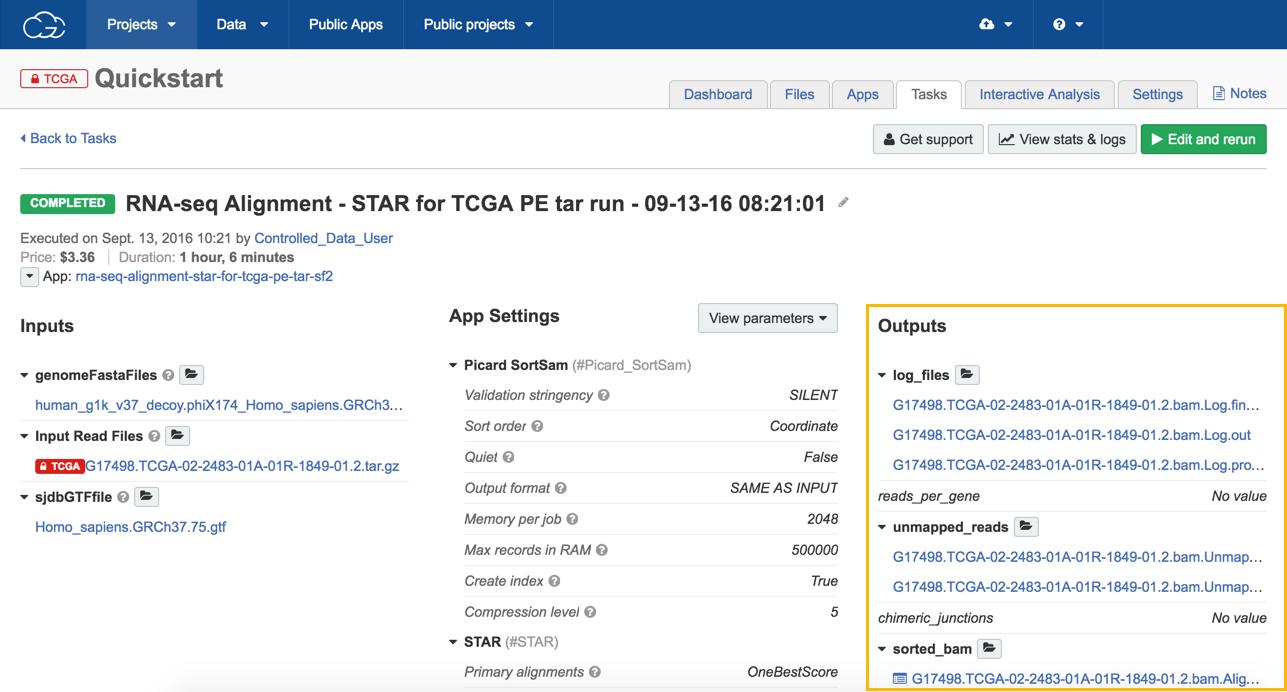
a. Open the task page.
b. Click on any of the files in the Outputs column (e.g. output_bam to review the alignment using the Genome Browser).
Quickstart video
Updated less than a minute ago
