Guide to Billing Groups on BioData Catalyst
Overview
Researchers who come to BioData Catalyst often migrate from a local computing environment such as a personal computer or a High Performance Computing (HPC) institutional cluster.
A key difference between a local environment and computing in the cloud is how resources are paid for. In the local environment, a researcher or institution purchases and maintains equipment such as RAM, CPUs, and hard drives. The upfront costs for the equipment can be high, however long-term, payments for maintenance and replacing parts can be relatively low.
In contrast, cloud computing provides all of the hardware, and researchers pay for specific usage, as described in the Seven Bridges Cloud Infrastructure Pricing guide.
To pay for cloud costs on BioData Catalyst Powered by Seven Bridges, a user needs a platform billing group with a defined funding source. Billing groups enable users to track computation and storage costs, and manage who has access to the funds.
The totals in the billing group are updated with continued usage, so administrators and PIs can always check the status. This guide will explain the different billing group types and how to get started with each.
What's in a billing group?
Billing groups track cloud costs across projects and enable the billing group owner to determine who can use the funding. The same billing group can support multiple platform projects, and billing group members can assign the billing group to any project where they have administrator status.
See below for a description of the membership levels and how to manage the billing group.
Membership
Administrators
The first administrator of a billing group is the owner of the billing group. Administrators have the ability to assign projects to the billing group, track cloud costs associated with the billing group, change the billing information, and manage membership of the billing group.
Additional members can be granted administrator status by the owner or another administrator.
Regular members
Regular members can be added to the billing group by an administrator. Regular members have the ability to assign the billing group to a project where they have administrative access.
Although regular members cannot view overall billing summary information like billing group administrators, they can track their costs within their projects through the Tasks tab or by viewing their previous Data Studio sessions.
Adding new members
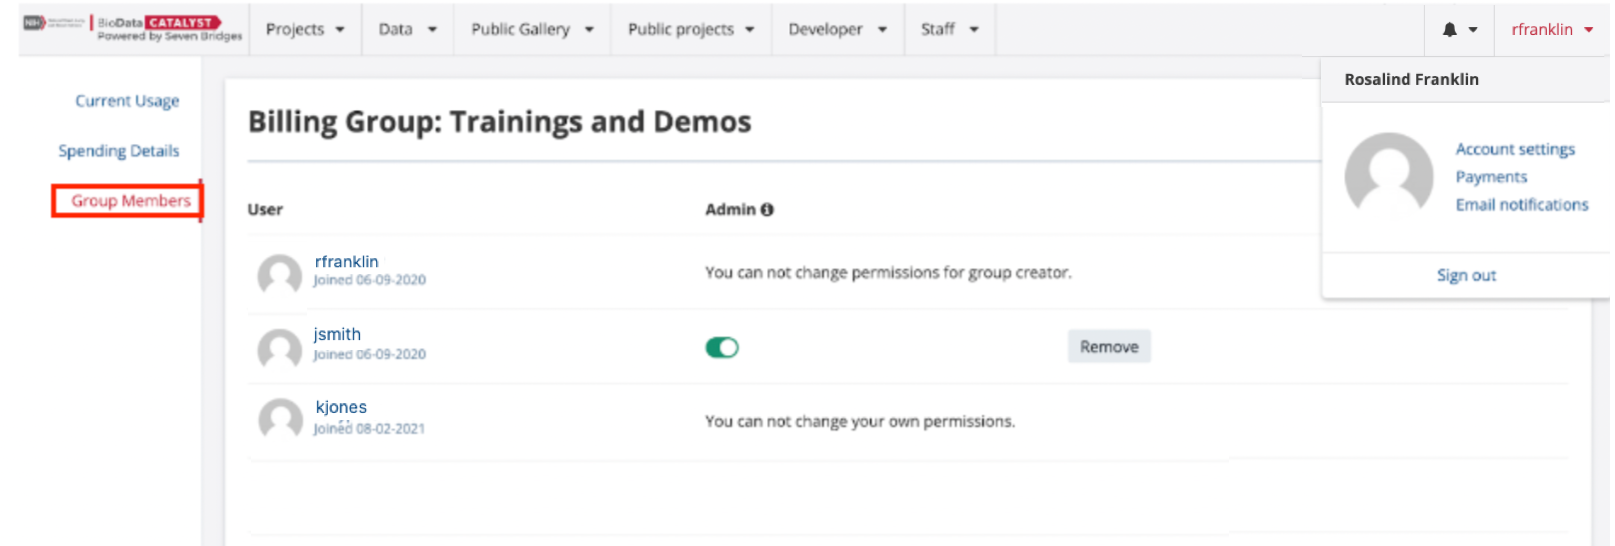
To add new members to a billing group, click the user ID in the top right corner and then click on Payments. Click on the billing group name to which you would like to add members.
Note that if you are not an administrator, you will not be able to click on the billing group.
Once in a billing group, click Group Members and add a new user at the bottom by searching for user ID or email address. Clicking the switch under “Admin” can grant or revoke administrators privileges for added members.
Tracking costs
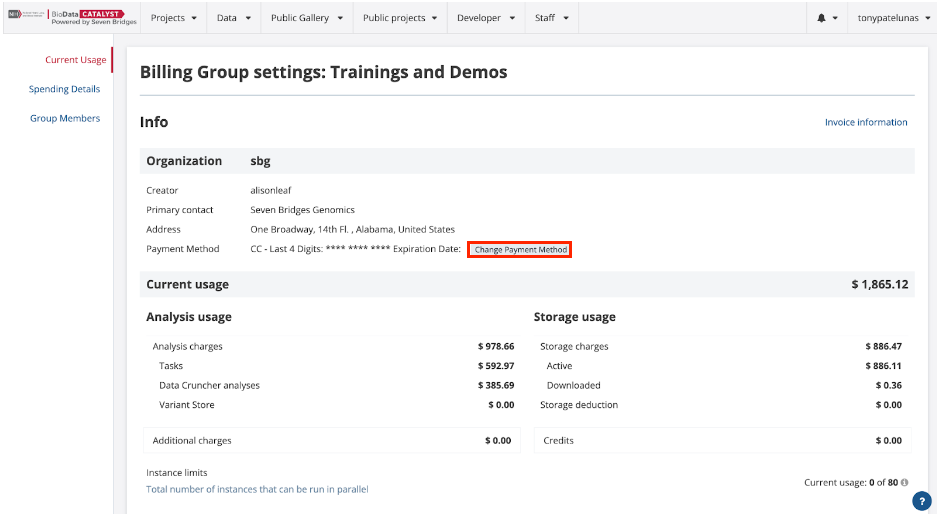
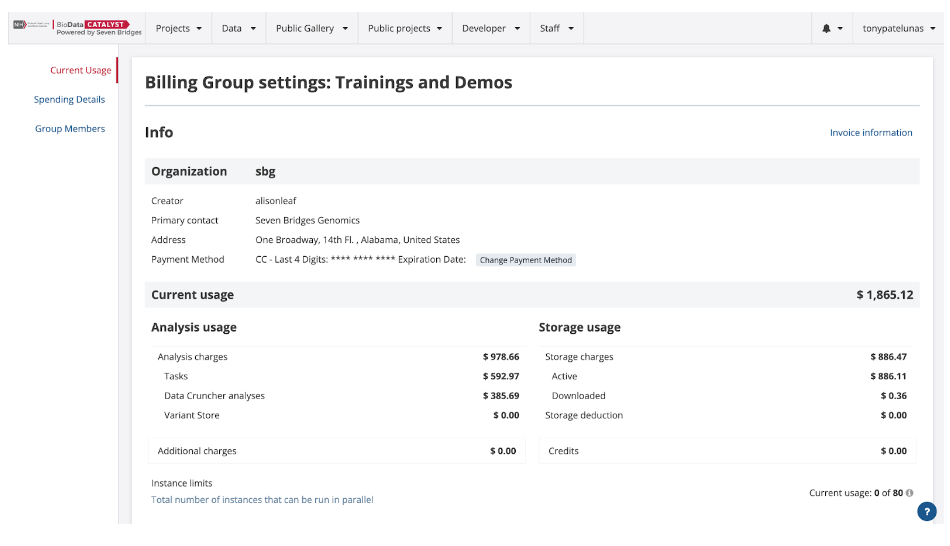
After selecting a billing group in the "Payments" page, the first view, “Current Usage,” summarizes the costs associated with that billing group as well as the invoicing information used by the Seven Bridges team.
You can add a credit card by clicking Change Payment Method. The costs are summarized by:
- analysis (computation)
- storage
- egress
- and specialized feature costs such as the Variant Store or Annotation Explorer
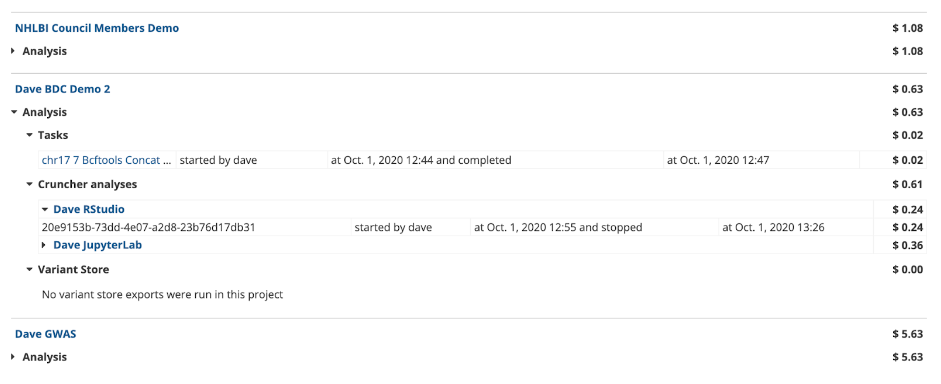
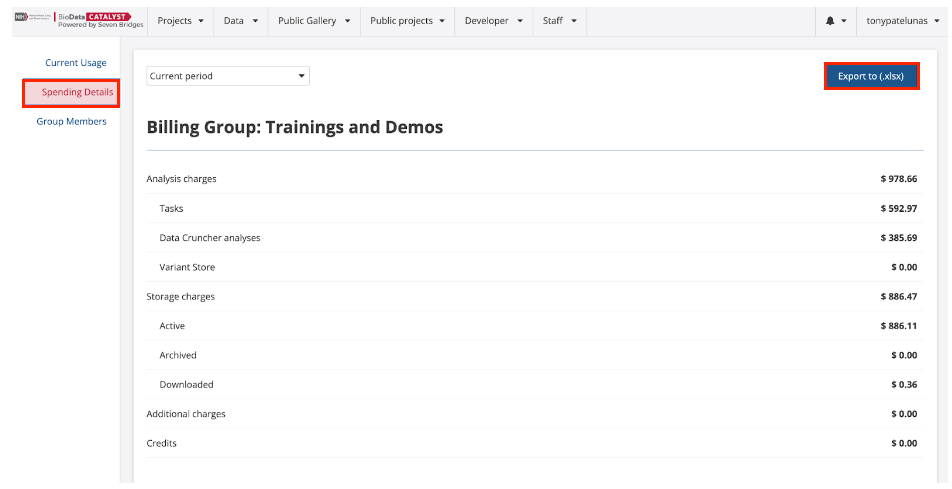
Beyond the summary, cloud costs can be tracked on a per project basis. By clicking Spending Details on the left, you will again see a summary of Analysis and Storage costs.
Scroll down to see a per project breakdown of costs. Each project is summarized on the right side, but click the arrow, and you will see a separation by Analysis type.
Under Analysis, an admin can view on a per task (CWL tool or workflow) or per Data Studio session basis which members created which computational costs. Access to this information makes it easier to estimate how much will be spent on future analyses.
Storage volume per project can be viewed by exporting the billing group spreadsheet. Select a period from the dropdown and click Export to (.xls).
The costs for storage can be estimated based on the total volume associated with a billing group and whether data has been archived. Note that calculated storage includes any file linked to a project, but you are only charged once for an uploaded or derived file and never for an NHLBI-hosted file.
Finally, when a billing group is created, a spending cap is set. This spending cap prevents new analysis from being run when exceeded and triggers a notification to the billing group owner when the billing group reaches 80% of the cap. For Regular billing groups (explained below), the billing group cap can be adjusted any time by the owner or administrator of a billing group emailing [email protected].
On BioData Catalyst, there are two kinds of billing groups: Pilot Funds and Regular. Below we will explore each of those.
Pilot funds
Every new account on BioData Catalyst Powered by Seven Bridges will start with a Pilot Funds billing group. This billing group will initially have $0 of cloud credits, and you won’t be able to run analysis until credits are added.
To add credits, apply for up to $500 in pilot funding by filling out the NHLBI Cloud Credit application. After NHLBI’s review, and if you are approved, $500 in credits will be added to your Pilot Funds billing group so you can begin your work. Researchers typically use these $500 to test their analyses, train on cloud computing, and generate pilot data for grants.
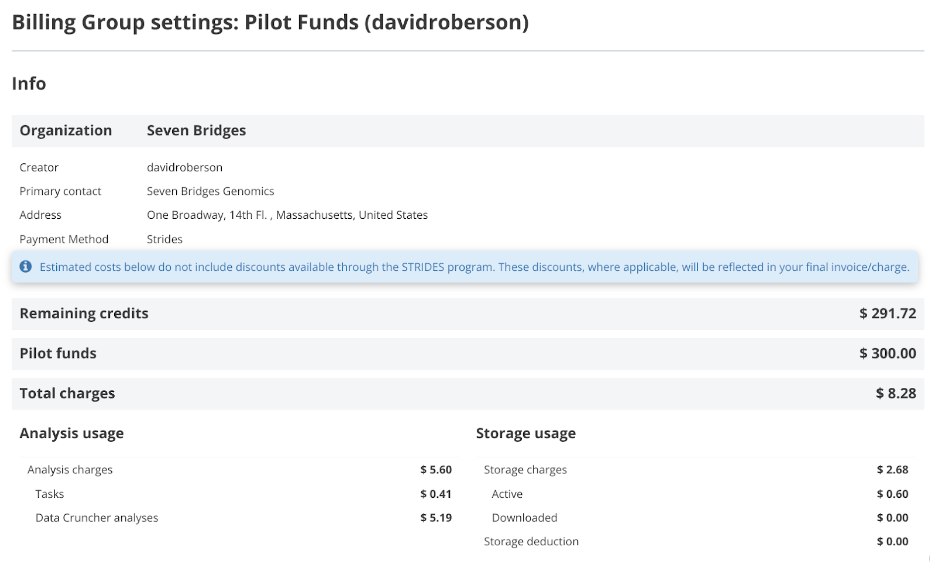
Once credits are added, you can view your billing group to see the remaining credits, total credits allocated, and total credits spent. The total credits will decrease as used and you will be notified when the billing group approaches zero.
Regular billing groups
After Pilot Funds have been used, you will need to set up a Regular billing group to continue your work. A Regular billing group pays for cloud costs via your own funding source (a grant, institutional award, etc).
The Seven Bridges team will generate the invoice and send it to your financial point of contact. You have two options for payment: pay-as-you-go with monthly invoicing or pre-pay.
Pay-as-you-go with monthly
With this payment method, you are billed monthly for any cloud costs that were incurred in the previous month. The billing group is configured with a maximum spending cap to aid in cost control, and the cap can be raised at any time.
Payments can be made by check, wire transfer, or credit card. Seven Bridges will create your billing group after you provide a point of contact for billing. You must provide a name, email address, and billing address for Seven Bridges to use for invoicing.
You must also provide a title for the billing group and your preferred payment method. If your organization needs a purchase order number on the invoice, please provide this as well.
Spending Caps
Setting a spending cap will alert you by email when you are close to your limit, and it will prevent you from running analyses once you are over your limit. However, it is still possible to exceed your spending cap, potentially by a large amount.
A task that is started before the spending cap is reached will not be terminated but will instead be allowed to run to completion. There are two reasons for this: 1) The total cost of a task or analysis is not known until the analysis is finished, and 2) Aborting a task that has partially completed will result in a failed task, which will waste the computation time that was spent.
Therefore, the spending cap should be set at a suitably low threshold until you are very comfortable using the platform. Email [email protected] with any questions or concerns you have.
Pre-pay
With this payment method, you make an upfront payment to Seven Bridges. This payment is applied as credits to a billing group and the maximum spending cap of the billing group is set to the amount that was paid. As you use the platform and incur cloud costs, you draw down from the prepaid amount. The Seven Bridges team can send you monthly usage statements.
To set up this payment plan, you need to provide either a check, wire/ACH, or credit card number and the amount that you want to prepay. You must provide a name, email address, and billing address for Seven Bridges to use for invoicing.
You must also specify what you would like the billing group to be titled. If your organization needs a purchase order number on the invoice, please provide this as well.
Unlike the Pilot Funds billing group, the current usage increases and the billing group does not display a cap (though one is set to notify the billing group owner and prevent runaway costs).
Creating a regular billing group
- Email [email protected] with the following information:
- Name and Seven Bridges User ID on BioData Catalyst Powered by Seven Bridges for one or more people that will have administrative access to the billing group (can add new members and track costs)
- Requested name for the billing group (researchers often use an abbreviation for a grant or initiative that is funding the work such as “NewLab - Cardiac Regeneration Grant”)
- Name, phone number, email address, and billing address for the financial point of contact (this is often a lab manager, grants manager, or institutional accounting office)
- Specify whether you want to pay-as-you-go or pre-pay and your preferred payment method (check, wire transfer, PO, or credit card).
- Initial billing cap for the billing group. Seven Bridges often recommends $500 or $1,000 as an initial cap. This can be changed any time in the future by the billing group administrator emailing [email protected].
- Seven Bridges support will respond that your billing group has been created and request further information if necessary such as how to add a credit card yourself.
- Set your new billing group for any existing projects by going to “Settings” in the top right corner of a project.
Additional resources
Updated about 1 year ago
