JupyterLab quick reference
JupyterLab is one of the two available editors in Data Studio, where the actual code editing and execution takes place. This document provides a brief description of the JupyterLab environment and its commonly used commands.
The interface
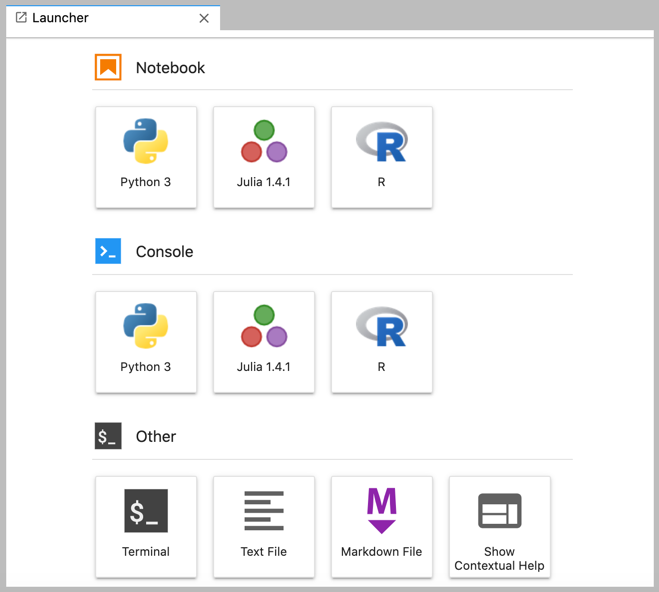
When you open JupyterLab, you see the Launcher screen that allows you to select one of the available options:

Choose one of the options in the Notebook section, depending on the programming language you want to use. Available programming languages and their versions might differ depending on the selected environment setup.
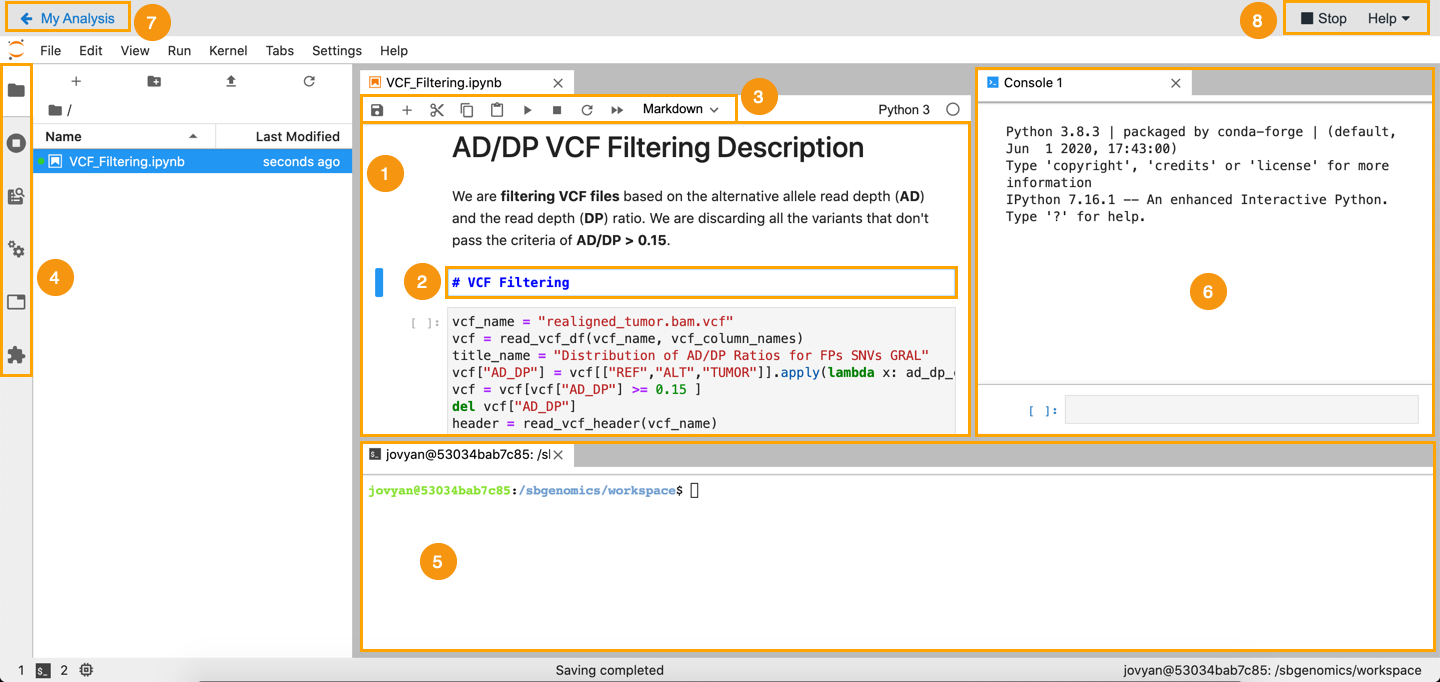
The editor screen showing a notebook and a terminal console open at the same time will look like this:

The main elements of the JupyterLab editor are:
- Notebook - The document that contains the code and outputs of an interactive analysis, as well as additional markdown or raw text that accompanies the code, but is not meant for execution.
- Cell - A single section of a notebook where you can enter code, markdown or raw text.
- Toolbar - Allows you to quickly perform the most common actions within a notebook, by clicking on an icon.
- Left-hand panel containing tabs that allow you to access some (or all) of the following functionalities:
- View and manage files that are created or added (uploaded or downloaded) within the analysis itself, including the Jupyter notebooks (
.ipynbfiles). - Manage kernel sessions that are currently running. One kernel session corresponds to one open notebook.
- View and use additional commands in the editor. To execute a command, click it in the list.
- Add notebook tags and metadata.
- Manage active tabs.
- View and manage files that are created or added (uploaded or downloaded) within the analysis itself, including the Jupyter notebooks (
- Terminal console - This is a JupyterLab Terminal extension equivalent to a Linux shell.
- Code Console - Enables you to run code interactively in a kernel.
- Back button - Allows you to navigate back from the editor to the analysis details page.
- Analysis control and help options:
- Stop - Allows you to stop the analysis directly from the editor.
- Help - Displays a dropdown containing a link to Data Studio documentation and the link to the feedback form through which you can contact our Support Team.
For more details about the visual interface, see the official JupyterLab documentation.
Commonly used text commands
Besides execution of Python, R or Julia code, you can also run the following types of commands directly in your notebook:
- Magic commands - a set of predefined functions that you can call with a command line style syntax. Magic commands can begin with a single
%symbol, in which case they take the rest of the line as an argument. If you prefix a magic command with a double%symbol (%%), it will take the rest of the cell as its argument. Learn more about magic commands or type%magicin a blank cell and execute it. - Linux shell commands - You can also run any system shell command by prefixing it with an exclamation mark (
!), for example!ls. You can even combine shell commands with the rest of the code in your notebook, for example:
myfiles = !ls
This line of code will assign the list of files returned by the ls command to the myfiles variable.
Find out more about functionalities related to text commands.
Data preview and download
If your Data Studio analyses in the JupyterLab contain data that you want to protect from being downloaded or previewed, make sure to restrict downloads and block network access.
This combination of settings will provide the highest project security level that also applies download restrictions to the Data Studio space, in addition to restrictions that are applied to the project space only when standard download restriction is enabled. The download option in the JupyterLab will remain visible but will not result in a download action when clicked.
Updated over 1 year ago
