CWL v1.2 conditional execution
Overview
Starting with CWL version v1.2 workflow steps can be skipped if a specified condition is met. The condition that defines whether a step will be executed or not is set through an expression entered in the Run Condition setting of a step input. The Run Condition expression is then mapped to the when CWL field in the underlying CWL code.
A step that is not executed is "skipped" and produces null for all output parameters. Conditional step outputs are then managed using the Pick Value Method (PickValueMethod in CWL) on downstream workflow step inputs or workflow outputs. To understand how the flow works, please take a look at the following workflow diagram:
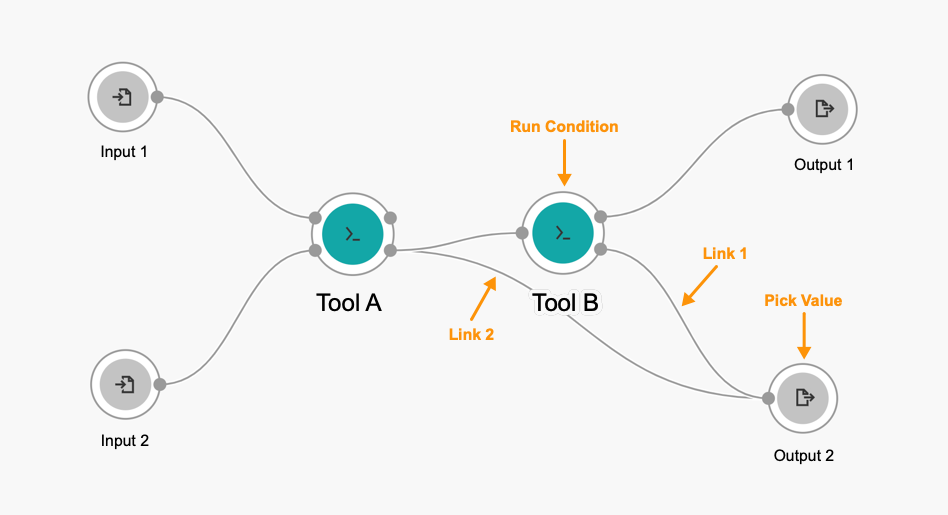
You can see that one output of Tool A is connected both to Tool B and Output 2. If we are trying to set up that, for example,Tool B is executed only if a certain condition is met, an appropriate conditional expression is entered in Tool B's Run Condition settings in the workflow editor. This results in Tool B either returning some values on its outputs if it is executed, or returning null if the condition is not met and the tool is "skipped" during workflow execution.
One of Tool B's outputs is also connected to Output 2 through Link 1, meaning that Output 2 will need a way to select a value to return as the result since it has two inbound data connections (Link 1 and Link 2). Therefore, Output 2 has Pick Value Method set so it could select the appropriate value from the two inbound connections. In this case, Pick Value Method is configured on a workflow output port, but it can also be configured on a tool input port, if we were to send the output of Tool A_and _Tool B to another tool for further downstream processing instead of presenting it as a workflow output.
Learn more about available Pick Value options and how to implement conditionals in real scenarios.
Setting a condition for step execution
To set a condition for step execution:
- Navigate to a project.
- On the main menu bar select Apps. The apps list opens.
- Click the name of the app you want to edit.
- In the top-right corner click Edit. The workflow editor opens.
- While on the Visual Editor tab, double-click the step in the workflow diagram that you want to edit.
- In the object inspector on the right, click the Step tab.
- Scroll down to the Run Condition section and click Set expression.
- Click </> to open the expression editor and enter your expression, then click Save.
- Click and enter an optional note describing the change.
- Click Save.
Managing conditional step outputs with pickValue
When the condition for running a step returns false, the step is skipped and it returns null on all outputs. The downstream tools most likely don’t need that null, but want a real value. For this reason Pick Value Method was introduced on step inputs to help with correcting null values in a desired manner, depending on the workflow configuration.
To deal with returned null values, Pick Value Method uses the following methods:
first_non_null- Picks the first non-null value in the list of returned values. Returns an error if there isn't a non-null value.the_only_non_null- Picks the only non-null value in the list of returned values. Returns an error if there is more than one non-nul value.all_non_null- Picks all non-null values from the list if returned values. If all values are null, the result is an empty list.
Learn more about pickValue and how it picks values among inbound data.
Implementing conditionals in real scenarios
Combinations of Run Condition and Pick Value Method allow for a lot of flexibility when specifying a workflow logic. Here we’ll show common patterns on a few real examples.
Optional step
This example will show how to create a workflow input that will serve as a switch and enable you to select whether to run or skip a tool (step) during workflow execution. To demonstrate this, we will be creating a new workflow usingBWA Mem Bundle and the CWL 1.0 version of Picard MarkDuplicates.
- Navigate to a project.
- On the main menu bar select Apps. The apps list opens.
- In the top-right corner click Add app.
- Select the Create New App tab.
- Click Create a Worfklow.
- Name the workflow. Make sure that the selected CWL version is v1.2.
- Click Create. The workflow editor opens.
- In the pane on the left, select the Public Apps tab.
- Search for BWA MEM Bundle.
- Drag and drop the BWA MEM Bundle app to the canvas on the right.
- Back on the Public Apps tab search for Picard MarkDuplicates CWL 1.0.
- Drag and drop the app from the apps list to the canvas on the right.
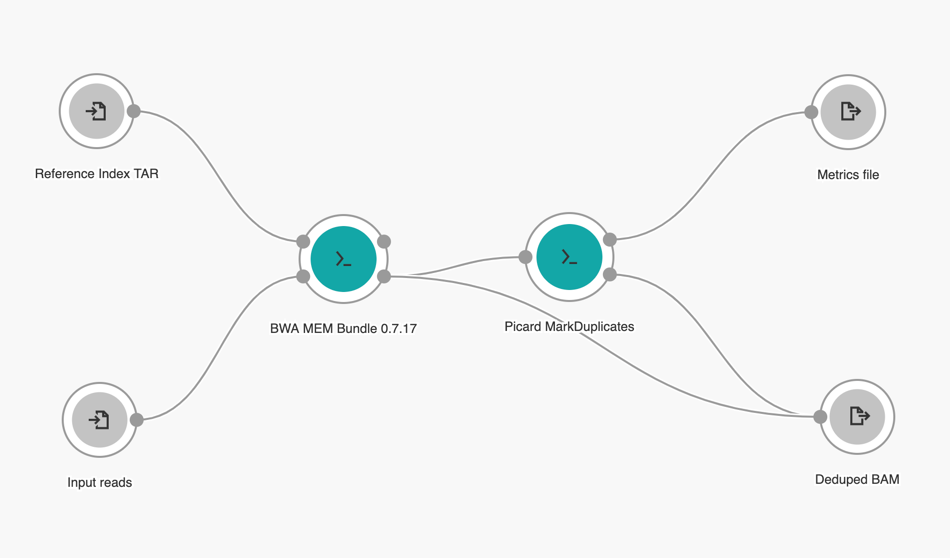
- Click and drag the input and output nodes on both tools to create workflow inputs, outputs and tool connections as shown below:
- Double-click Picard MarkDuplicates. Object inspector opens.
- In the object inspector on the right, select the Inputs tab and scroll down to the bottom of the list.
- Click Add new input. A new input port named custom_input is created.
- Change the input type from Default to Port. The new input port shows up on Picard MarkDuplicates.
- Click and drag the custom_input input port to the left to create a new workflow input.
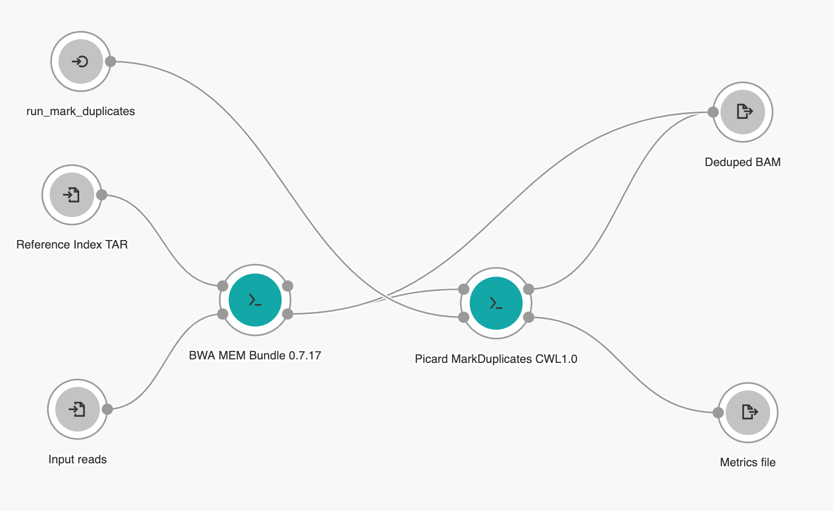
- Double-click the newly-created input port and change its ID to run_mark_duplicates. Note that this input port will still be referred to as custom_input when used in the code later on. Your workflow should now look like this:
- Double-click Picard MarkDuplicates. Object inspector opens.
- In the object inspector on the right, select the Step tab and scroll down to the bottom of the list.
- In the Run Condition section click Set expression.
- Click </> to open the expression editor and enter the following expression:
$(inputs.custom_input)
- Click Save.
- Now double-click the Deduped BAM workflow output.
- In the object inspector on the right, scroll down to the bottom of the list.
- In the Pick Value Method dropdown, select First non null. This means that the value returned on this output will be the first non-null item it gets through its inbound links. So, when running this workflow, if the user selects to skip Picard MarkDuplicates, the output of the tool output will be null. Therefore, the first non-null item received by the Deduped BAM output is the file returned through the second inbound link, from BWA MEM Bundle.
- Click and enter an optional note describing the change.
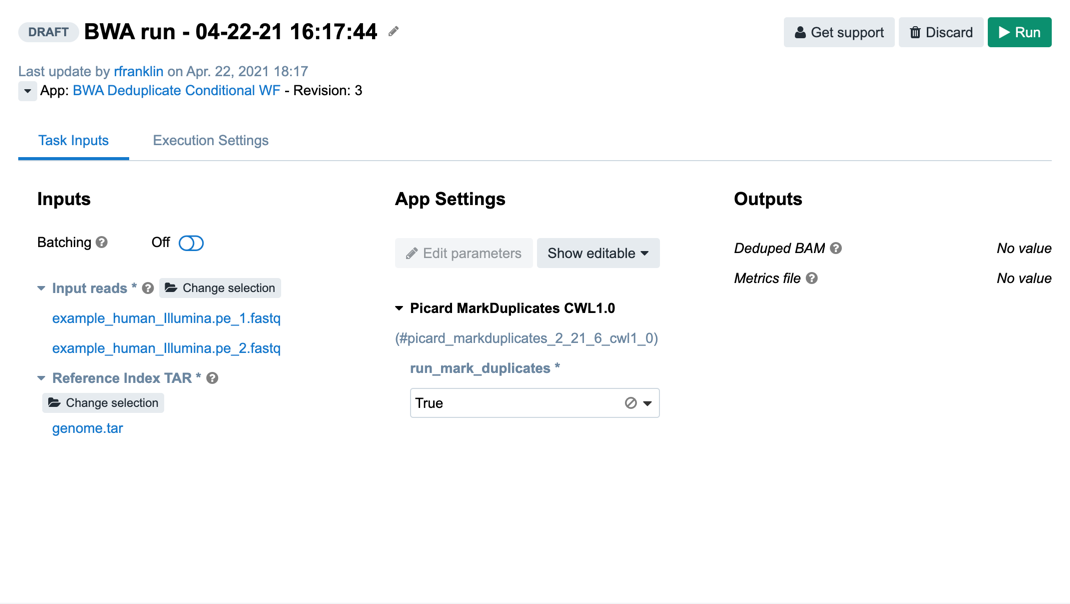
- Click Save. Your workflow is now ready to be run. This is what a draft task with configured parameters looks like:
When using the First non null option for Pick Value Method, note that the order of inbound connections is very important as it determines which inbound data will be evaluated first. In the example above, the Deduped BAM output has two inbound connections, the one from Picard MarkDuplicates and the one from BWA MEM Bundle. As the logic is to use the file produced by Picard MarkDuplicates if it exists, or use the file produced by BWA MEM Bundle otherwise, Pick Value Method should first check the output of Picard MarkDuplicates. If this output is null, then the one produced by BWA MEM Bundle is the first non-null value, and is selected by the Pick Value Method.
To check the order of inbound connections, see the Connections section for the tool input port or workflow output port you are setting Pick Value Method for:
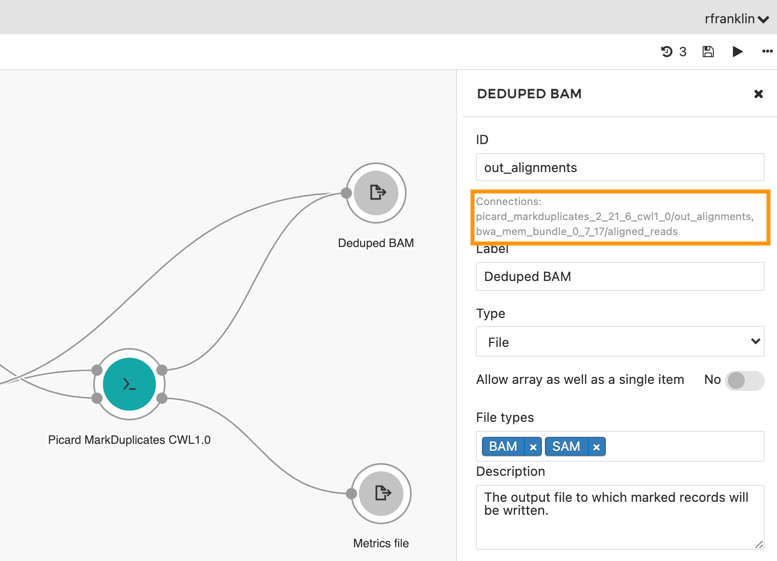
If you need to change the order of connections, this is done directly in the CWL code, which is accessed by clicking the Code tab in the editor. For a workflow output, you need to change the order of items in outputSource, within the outputs section of the workflow CWL code. For a step input, you need to change the order of items in the in.source property of the specific workflow step.
Multiple choice
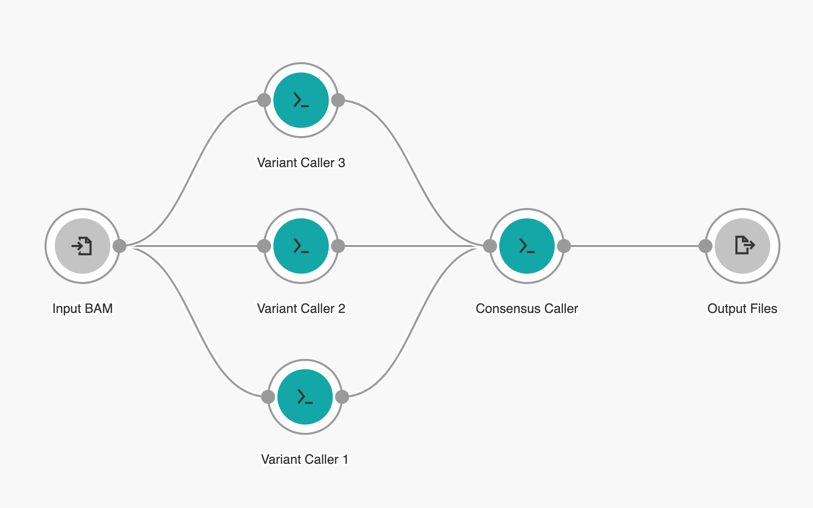
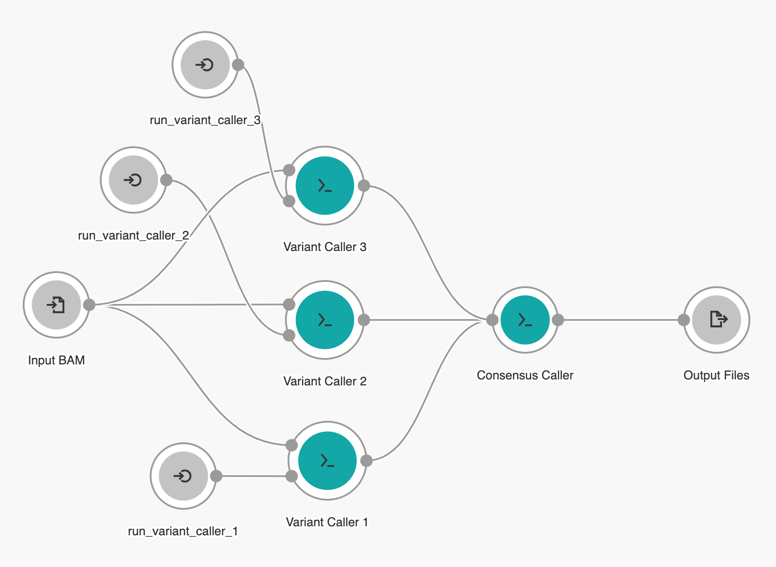
This example will deal with the situation of having multiple variant callers perform variant calling on an input file. We will add a new boolean input to each variant caller, and this input will act as a switch that allows users to enable or disable the use of the specific variant caller in the workflow. This is achieved by setting each variant caller's Run Condition to evaluate whether the "switch" input is set to true or false. Finally, outputs of each variant caller will be linked to a single input of a consensus calling app, whose Pick Value Method will be set up to use all non null inputs.
Note that the tools that are a part of the workflow are not actual tools, but generic placeholders for any variant calling tool. Also, the number of variant callers in the example is three, but you can use the procedure below to configure a different number (2 or more) of tools to be used, by following the setup described in the example below.
To set up a multiple-choice variant calling workflow follow the steps below:
- Navigate to a project.
- On the main menu bar select Apps. The apps list opens.
- In the top-right corner click Add app.
- Select the Create New App tab.
- Click Create a Worfklow.
- Name the workflow. Make sure that the selected CWL version is v1.2.
- Click Create. The workflow editor opens.
- In the pane on the left, select the Public Apps tab.
- Search for the variant callers and consensus callers you want to add to your workflow.
- Drag and drop each app from the apps list to the canvas on the right.
- Click and drag the input and output nodes on all tools to create workflow inputs, outputs and tool connections as shown below:
- Double-click one of the variant calling tools. Object inspector opens.
- In the object inspector on the right, select the Inputs tab and scroll down to the bottom of the list.
- Click Add new input. A new input port named custom_input is created.
- Change the input type from Default to Port. The new input port shows up on the tool.
- Click and drag the custom_input input port to the left to create a new workflow input.
- Double-click the newly-created input port and change its ID to e.g. run_variant_caller_1. Note that this input port will still be referred to as custom_input when used in the code later on. Your workflow should now look like this:
- Double-click the variant calling tool you were editing. Object inspector opens.
- In the object inspector on the right, select the Step tab and scroll down to the bottom of the list.
- In the Run Condition section click Set expression.
- Click </> to open the expression editor and enter the following expression:
$(inputs.custom_input)
- Click Save.
- Repeat steps 12 to 22 for the other variant callers in the workflow.
- Now double-click the consensus calling tool.
- In the object inspector on the right, scroll down to the bottom of the list.
- In the Pick Value Method dropdown, select All non null. This means that the values used by this tool will be all non-null items it gets through its inbound links.
- In the object inspector select the Step tab.
- In the Run Condition section click Set expression.
- Click </> to open the expression editor and enter the following expression, making sure to replace
in_filewith the name of the input where the tool receives input files from variant callers:
$(inputs.in_file.length > 0)
- Click Save.
- Click and enter an optional note describing the change.
- Click Save. Your workflow is now ready to be run.
Scattering and step conditions
If a step is scattered and there is a condition set, the scatter jobs are created first and the condition is evaluated separately for each scattered job.
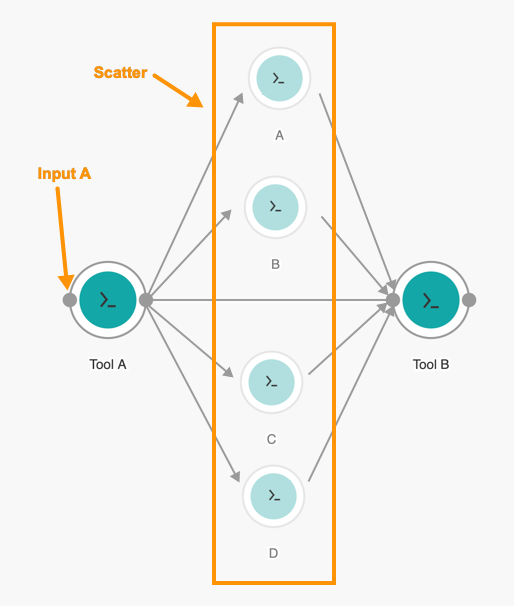
For example, scatter is set for Tool A, and a list of four input values, e.g. [1,2,3,4] is provided in Input A. The following Run Condition is set for Tool A:
${ if (inputs.a > 3) {return true} else {return false} }
As scatter is enabled, four instances of Tool A(jobs) will be run, labelled as A, B, C and D in the workflow diagram above. Each job will take one value from the list provided on Inputs A, replace inputs.a in the expression with the value and evaluate the expression. As the Run Condition in the expression is inputs.a > 3, this means that out of the four jobs that were created as the result of scattering, only the last one will return a value as it satisfies the condition of input value being greater than 3, while the others will return null. Therefore the final output of Tool A will be [null, null, null, 4].
Downstream, Tool B needs to be set up to work with the list of values it receives from Tool A, precisely from the 4 parallel jobs that resulted from enabling scattering on Tool A. To make sure Tool B gets an actual value to work with instead of using null values, you need to set the Pick Value Method of Tool B to one of the available options: First non null, The only non null or All non null. In this case, First non null and The only non null options will result in selecting the value 4, while All non null will result in a list containing a single item - [4].
Updated almost 5 years ago
